Table des matières
Commande centrale
Le but de cette réalisation est d'avoir une commande centrale pour effectuer des actions diverses.
Ca évite d'avoir son smartphone ou d'aller sur le site web de la centrale domotique.
Matos
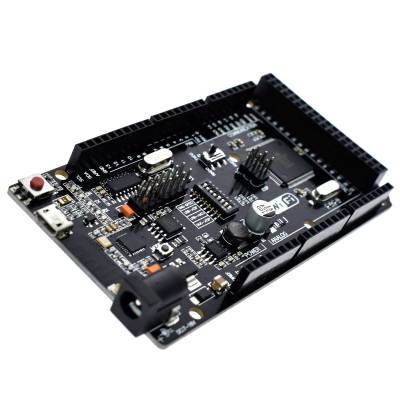
- MEGA+WiFi R3 ATmega2560+ESP8266, flash 32MB, USB-TTL CH340G, Micro-USB de ROBODYN.
- Afficheur Touchscreen TFT ILI9486.
- Emetteur/Récepteur RF433MHz.
- Module RTC I2C 24C32 mémoire DS1307 horloge.
- Une alimentation 220v/12V
Pour mon projet, je vais essayé d'utiliser mon Mega-WIFI de Robodyn.
Doc du produit

En gros il s'agit d'un Arduino Mega couplé avec un ESP sur la même carte au dimension du Mega.
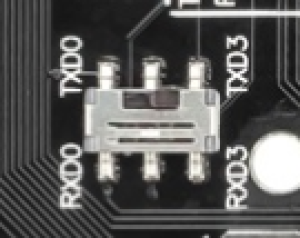
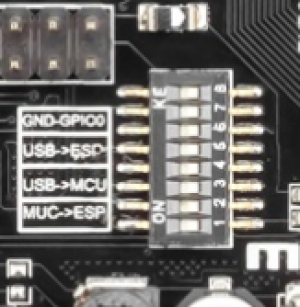
Grace à des minidip, on peu utiliser l'arduino ou l'esp seul, relié par le port RS232 TX3/RX3 du mega à l'ESP, ou ensemble.
Du coup on a un arduino Mega avec toute sa mémoire et sa puissance, que l'on peu connecter au WIFI vie l'ESP.
Quelques liens:
Il y a sans doute d'autre site, mais ceux cités permette déjà de bien comprendre le fonctionnement.
Elle ne fonctionne pas exactement comme une carte MEGA, notamment au niveau des interruptions.
    Serials 0 (RX) and 1 (TX);
    Serial 1s 19 (RX) and 18 (TX);
    Serial 2s 17 (RX) and 16 (TX);
    Serial 3s 15 (RX) and 14 (TX).
    Used to receive (RX) and transmit (TX) TTL serial data.
    Pins 0 and 1 are also connected to the corresponding pins of the ATmega16U2 USB-to-TTL Serial chip.

    External Interrupts:
    2 (interrupt 0),
    3 (interrupt 1),
    18 (interrupt 5),
    19 (interrupt 4),
    20 (interrupt 3),
    21 (interrupt 2).
    These pins can be configured to trigger an interrupt on a low level, a rising or falling edge, or a change in level.
    See the attachInterrupt() function for details.

    PWM: 2 to 13 and 44 to 46.
    Provide 8-bit PWM output with the analogWrite() function.

    SPI: 50 (MISO), 51 (MOSI), 52 (SCK), 53 (SS).
    These pins support SPI communication using the SPI library.
    The SPI pins are also broken out on the ICSP header, which is physically compatible with the Uno and the old Duemilanove and Diecimila boards.

    LED: 13. There is a built-in LED connected to digital pin 13.
    When the pin is HIGH value, the LED is on, when the pin is LOW, it’s off.

    TWI: 20 (SDA) and 21 (SCL).
    Support TWI communication using the Wire library.
    Note that these pins are not in the same location as the TWI pins on the old Duemilanove or Diecimila boards.
    The Mega 2560 has 16 analog inputs, each of which provide 10 bits of resolution (i.e. 1024 different values).
    By default they measure from ground to 5 volts, though is it possible to change the upper end of their range using the AREF pin and analogReference() function.
Pour programmer le Mega ou l'ESP voici le tableau de switch :
| Switch status and mode selection: | 1 | 2 | 3 | 4 | 5 | 6 | 7 | 8 |
| CH340 connect to ESP8266 (upload sketch) | OFF | OFF | OFF | OFF | ON | ON | ON | NoUSE |
| CH340 connect to ESP8266 (connect) | OFF | OFF | OFF | OFF | ON | ON | OFF | NoUSE |
| CH340 connect to ATmega2560 (upload sketch) | OFF | OFF | ON | ON | OFF | OFF | OFF | NoUSE |
| CH340 connect to Mega2560 COM3 connect to ESP8266 | ON | ON | ON | ON | OFF | OFF | OFF | NoUSE |
| Mega2560+ESP8266 | ON | ON | OFF | OFF | OFF | OFF | OFF | NoUSE |
| All modules work independent | OFF | OFF | OFF | OFF | OFF | OFF | OFF | NoUSE |
Voici où change le port série entre le mega et l'ESP :

Après avoir changer le mode sur la carte, il faut configurer l'IDE.
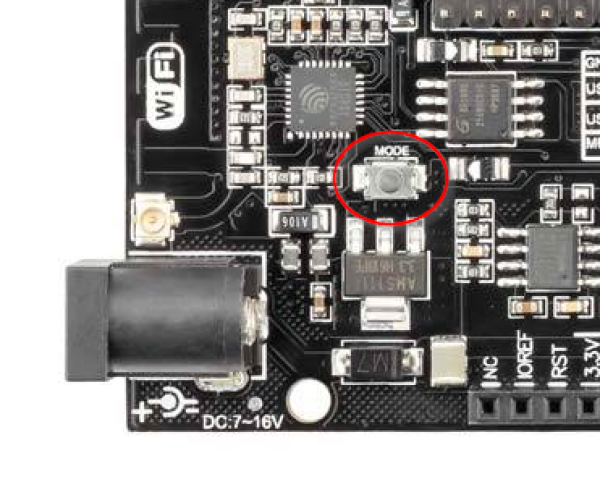
Il est important quand l'ESP est programé de presser le bouton “MODE”
After choosing the mode of the board can proceed to set up the IDE
It is important that when the ESP8266 module is programming, it is necessary to press the button “Mode”
Description
Cette centrale à pour interfaces :
- Un écran tft de 3.5“ a touchscreen.
- Un émetteur/récepteur 433MHz.
- Une interface WIFI (esp)
- Quelques capteurs, lumière, temp, hum, mesure courant, mesure débit eau.
- un module RTC.
Ce qu'elle fait :
- Affiche l'heure et quelques mesures.
- Met/arrête l'alarme.
- Gère les capteurs, affiche les données (suivant menu) et envoi à la centrale domo par MQTT.
- Quelques fonctions (à définir) qui pilote la centrale domo. (éteint lumières, désactive automates…)
Plan de route
Nouvelle rubrique, le projet est ambitieux, il faut passer par des étapes.
- Créer un clavier sur TFT
- Maîtriser la connexion WIFI du MEGA WIFI, test du MQTT.
- Connecter un module RTC, afficher l'heure.
- Connecter un module lumière, temp, humidité, afficher.
- Connecter un émetteur/récepteur 433MHz, Collecter les données des capteurs, afficher ou agir.
- Connecter un(des) module(s) conso courant EDF, afficher
- Connecter un module de mesure de débit d'eau, afficher.
Enfin mettre tous cela ensemble avec un menu pour afficher les différentes données.
Schémas
A FAIRE !

